As part of a drive to improve security we are moving more of our AWS EC2 development instances behind a VPN. This is fine for most things but the code editor we use, ShiftEdit, won’t see the servers behind the VPN as they are not publicly assessable over SSH. This means I was looking for a different solution. Ideally I wanted a code editor that had native SSH support using private keys or agent forwarding and had a tabbed interface. Unfortunately none of major players seemed to have what I was looking for.
There are a number of free editors that have sprung up recently including Adobe Brackets, Microsoft’s Code and Atom from GitHub. I really like Atom and I noticed that there were some plug-ins that purportedly supported SSH so I gave a couple of those a go but none seemed to work very well. One connected but wouldn’t show any files and the other wouldn’t connect at all.
Then I stubbled upon MacFuse, a Google project that allows you to mount various file systems as virtual drives on a Mac. This sounded ideal but the project had been discontinued a while ago but a quick search led me to one that was spawned from MacFuse that is still supported – FUSE for OSX.
It took me a while to get my head around how to connect FUSE for OSX to an EC2 instance so here is how I did it.
Installing the Required Components
First of all download and install FUSE for OSX from here: https://osxfuse.github.io/. Installation is mainly a case of clicking through the installer but when you get to the option make sure that you select “MacFUSE Compatibility Layer”:

Next download and install Macfusion from here: http://macfusionapp.org/. Then start Macfusion.
Configuring Macfusion
The first time you run you will see the following screen. Click Start and select the option to start at Login.

Next click the + at the bottom to add a new destination and select SSHFS from the menu:

Now enter your instance details:

It isn’t necessary to make any changes on the other tabs.
Making the Link to Your Key
Before you can connect to your instance you have to let Macfusion know where your key is held. To do this you need to create a text file called “config” in ~/.ssh. Into this file you need to put the following (changing “your-instance-key.pem” for the name of your key file).
IdentityFile ~/.ssh/your-instance-key.pem
You can add as many keys here as you need.
Connecting to Your Instance
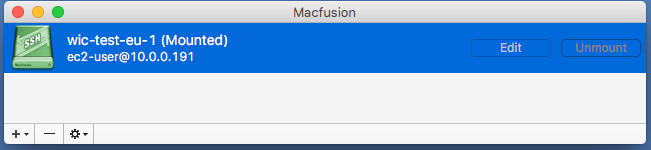
Now you have everything set-up you can go back to Macfusion and click on the Mount button:

All being well the icon should turn green and say Mounted, as follows:

Viewing Your Files
Finally go to Finder and when you look at your mounted devices you should see your SSH drive. When you double click it will list the file on the remote drive and you can use them just as you would any other local file.

I was able to select a folder as a project in Atom and edit just as if the files were local.
When you are done unmount the drive.
It’s all relatively straight forward, let me know how you get on.
ShiftEdit has SSH key support and it’s possible to expose the SSH port of your instances that are behind VPN. For security you could restrict access to ShiftEdit’s IPs only.
Hi Adam, having used ShiftEdit for a number of years I’m aware that it has SSH key support. I’ve re-read the article and I don’t think it suggests that it doesn’t. As for your suggestion to expose the port through the Vpn I could do so but I was looking for a different solution to the problem. However, since MacOS Sierra MacFusion no longer works so I have switched to Mountain Duck.
I really like ShiftEdit and am still a paying customer but it has become increasingly difficult for me to use it as we have moved almost all of our servers behind a bastion host so access requires key forwarding which I think would be pretty impossible for you to implement.